I downloaded the pattern for these hats from the lion brand yarn website. I love their free patterns! Anyway, I knitted one for each of our boys. Ben picked red, Jacob wanted blue, and I picked orange for Kaden. They are a little big on them but that just means they have room to grow.
Monday, November 30, 2009
Friday, November 27, 2009
Family Tree
I cross-stitched this for my in-laws as a christmas gift last year. They gave it back to me so I could add Kaden's name and I FINALLY got it done. I'm really happy with the way it turned out. Also, Aaron made the frame as his contribution to the gift.
I made this one for my mom about 10 years ago and I have been adding to it everytime there is a wedding or birth. She loves it and has hung it proudly since the day I gave it to her.
Tuesday, November 24, 2009
Gift Exchange
I signed up for a handmade gift exchange. It seems like it will be really fun. If you want to sign up too - go HERE. Hurry though you only have until November 28th to sign up.
Monday, November 23, 2009
Thanksgiving Crafts
I have a few more Thanksgiving projects that I wanted to share with everyone. The first is a GIVE THANKS banner (I guess that is what you would call it). I made this a couple of years ago out of white cardstock covered with scrapbook paper and then I cut out letters to put on it. I connected each square with some hemp cord. It actually is pretty dang cute.
The second projects is a set of Happy Turkey Day blocks. I got this idea from my SIL Leslie and since I already had something that says GIVE THANKS, I went with HAPPY TURKEY DAY.
The last thing I wanted to share is TURKEY FINGER PUPPETS. I got the idea from here. They turned out so cute and the boys love them. They seriously took me like 15 minutes or less to make all three.
Jake doesn't look too happy here - check out his eye! It happened right before the pic was taken.
Thursday, November 19, 2009
Flannel Strip Baby Blanket Tutorial
I decided to make a tutorial of this in case any one was interested. I saw one at church and figured out how to make it so here goes:
Supplies needed:
3 yards of flannel (I get 1 yard of 3 different coordinating colors)
matching thread
Now take your scissors and clip all the seams from the edge to the thread.
Supplies needed:
3 yards of flannel (I get 1 yard of 3 different coordinating colors)
matching thread
sewing machine
scissors
rotary cutter and mat
The first thing you do is cut your flannel into strips. Cut one yard into 6 - 6 in. strips; one yard into 8 - 4.5 in. strips; and one yard into 4 - 9 in. strips.
6 in. strip
Match your strips wrong side to wrong side and sew a 1/2 in. seam around all 4 sides. Once you have done that you should have 3 - 6 in. strips; 4 - 4.5 in. strips; 2 - 9 in. strips.
Sewing strips wrong sides together
Now you are going to sew the stips together in the following pattern: 6 in., 4.5 in., 9 in., 4.5 in., 6 in., 4.5 in., 9 in., 4.5 in., 6 in. When you are done if you have uneven seams - trim them evenly.
Sewing 6 in. strip to 4.5 in. strip
Back side after all strips have been sewn together
Clipping seams
Clipped edges
Front side after seams have all been clipped
It takes about an hour to sew the blanket together and clip the seams. So it is a really quick, easy blanket. Once you are done clipping the seams, wash and dry the blanket and this will be the final product:
Monday, November 16, 2009
Ribbon tree
I saw a picture of one of these a while ago and decided to give it a try. They are pretty easy - a little time consuming. All you need is a styrofoam cone, assorted ribbon, and something to hold the ribbon on the styrofoam (I used tiny pins). I also used a small green bow for the top. It took me a while to do - what with cutting all the ribbon and sticking them one by one on the tree. The one I saw wasn't really done in layers, the ribbon was just kind of stuck all over with no specific pattern. I really like the way this one turned out though.
Friday, November 13, 2009
Foamboard Frame
Thursday, November 12, 2009
Fabric Christmas Tree
This little tree is so easy to make - you can have it done in about a half hour or less. My mom and I made them on Sunday afternoon and it took no time at all. You take 5 circles - each one about 2 inches smaller than the one below it, hand stitch a gather stitch around the outside edges, fill with polyfil, pull the thread tight and knot off, then glue them together with a hot glue gun. Add a star to the top and - waa la - DONE! It really is very simple to make.
Tuesday, November 10, 2009
Rooster Cutting Board
Please Vote!
Hey Everyone - I entered a contest that Michaels is having. It's called Homemade Holidays. I entered my Give Thanks Countdown. Please go here and vote for me. Every vote counts toward the winner so VOTE!!
Sunday, November 8, 2009
Thanksgiving Wall Hanging
I made this little cross-stitch wall hanging the first year Aaron and I were married. We had NO money for decorations and I had all the supplies to make this on hand - so this was our only decoration that year. I have since acquired a few more Thanksgiving decorations (most of them handcrafted by yours truly).
Thursday, November 5, 2009
Grand Gobbler
I made this a couple of years ago from a pattern that I found on the internet. You can find the pattern here. This is by far my favorite Thanksgiving craft that I have done. Its quick and easy so if you are looking for that type of thing - this is it!
Wednesday, November 4, 2009
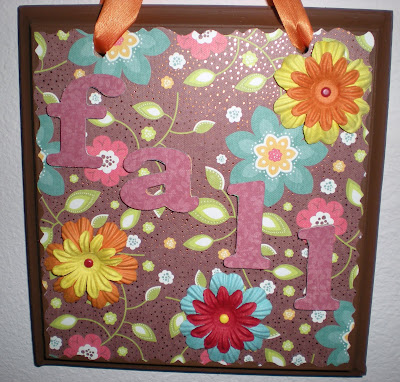
Feeling Fall
When I got out my Thanksgiving decorations the other day, I realized I didn't have too many to celebrate my favorite holiday/time of year. My dad was cutting some wood plaques out for my mom so I asked for one and this is what I came up with. It is much cuter in person and even Aaron didn't make fun of me for this one - probably because I didn't use mod podge!
Subscribe to:
Comments (Atom)


